
A compound microscope has about 20 parts, and they fall into three groups. The optical parts (eyepiece, objective lenses and condenser) magnify the specimen. The mechanical parts (stage, nosepiece and focus knobs) hold and move it. The illumination parts (light, diaphragm and aperture) light it from below. The diagram and table below show where each part is and what it does.
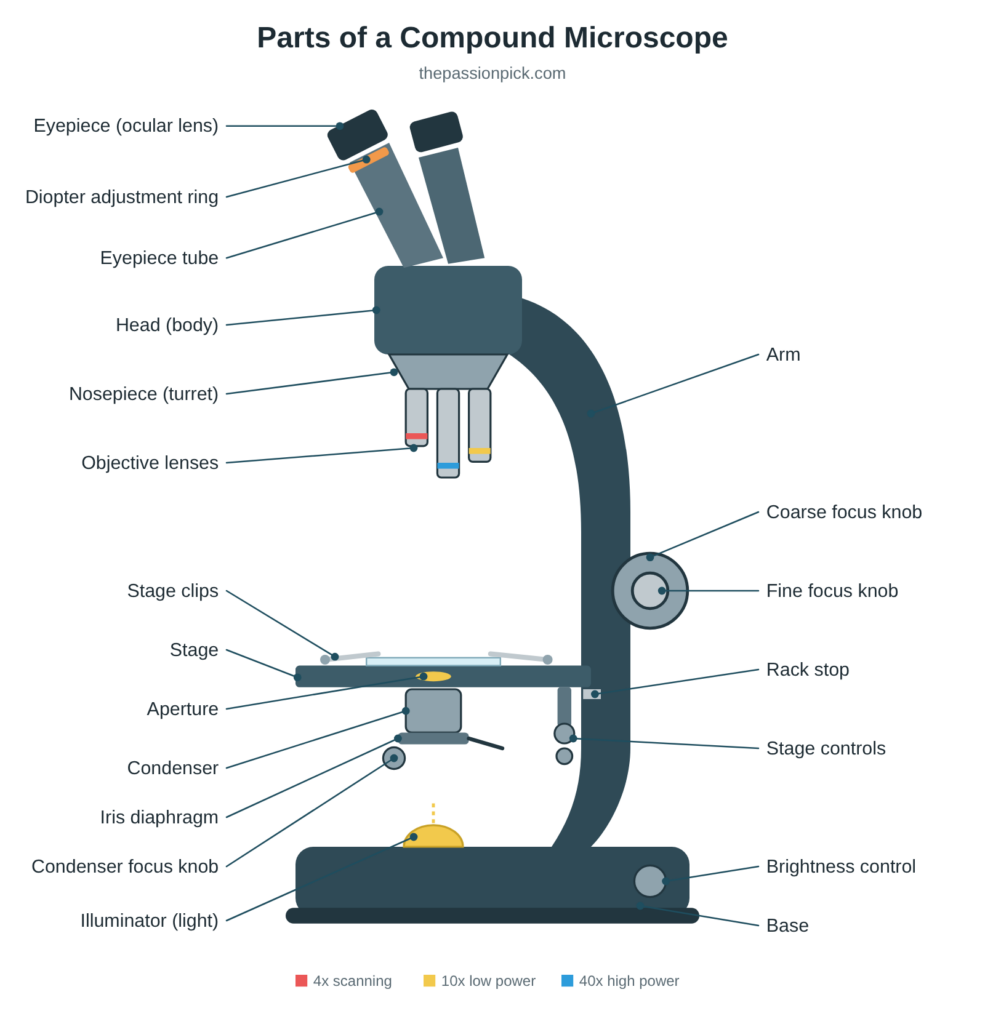
Microscope parts and functions at a glance
| Part | Type | Where it is | What it does |
|---|---|---|---|
| Eyepiece (ocular lens) | Optical | Top of the microscope | The lens you look through; usually magnifies 10x |
| Eyepiece tube | Mechanical | Between the eyepiece and the head | Holds the eyepiece at the right distance from the objectives |
| Diopter adjustment ring | Mechanical | On one eyepiece | Corrects for differences between your two eyes |
| Head (body) | Structural | Upper part | Houses the optics and connects the eyepiece to the objectives |
| Arm | Structural | Curved back section | Supports the head; the part you hold when carrying the microscope |
| Base | Structural | Bottom | Supports the whole microscope and usually holds the light |
| Nosepiece (turret) | Mechanical | Under the head | Rotating mount that holds the objective lenses |
| Objective lenses | Optical | Hanging from the nosepiece | Main magnifying lenses, usually 4x, 10x, 40x and 100x |
| Stage | Mechanical | Flat platform above the light | Holds the slide |
| Stage clips | Mechanical | On top of the stage | Keep the slide in place |
| Stage controls | Mechanical | Under or beside the stage | Move the slide left, right, forward and back |
| Aperture | Illumination | Hole in the center of the stage | Lets light pass up through the slide |
| Condenser | Optical | Just below the stage | Focuses light onto the specimen |
| Iris diaphragm | Illumination | Under the condenser | Controls how much light reaches the specimen |
| Condenser focus knob | Mechanical | Below the stage | Raises or lowers the condenser |
| Coarse focus knob | Mechanical | Large knob on the arm | Moves the stage quickly for rough focus |
| Fine focus knob | Mechanical | Small knob on the arm | Makes small movements for a sharp image |
| Rack stop | Mechanical | Behind the stage | Stops the stage rising so far that the lens hits the slide |
| Illuminator | Illumination | In the base | The light source, usually LED or halogen |
| Brightness control | Illumination | On the base | Adjusts the light intensity |
| Mirror (older models) | Illumination | Below the stage | Reflects room light up through the specimen |
What is a compound microscope?
A compound microscope uses two sets of lenses, the objective and the eyepiece, to magnify a specimen in two stages. That “compound” lens system gives a magnification of about 40x to 1,000x, which is enough to see individual cells, bacteria and the structures inside them. Specimens like yeast cells and red blood cells are invisible to the naked eye but show clear detail under a compound microscope.
Compound microscopes light the specimen from below, so the light passes through it. That means specimens need to be thin, usually mounted on a glass slide. For looking at larger, solid objects like insects, rocks or coins in 3D at lower magnification, a stereo microscope is the better tool.
There are several specialized types of compound microscope, including biological, phase contrast, polarizing, metallurgical and fluorescence microscopes. They all share the same basic parts described below. If you’re shopping for one, see our guide to the best compound microscopes.
The three structural parts: head, arm and base
Structurally, every compound microscope has three sections.
- Head (body): the top section that holds the optical parts. The eyepiece sits on top and the nosepiece hangs below it.
- Arm: the strong, curved back section that connects the head to the base. Always carry the microscope by the arm, with your other hand under the base.
- Base (foot): the heavy bottom section that keeps the microscope stable. On most modern microscopes it also holds the illuminator and the brightness control.
Optical parts of a compound microscope
The optical parts do the magnifying. They’re the most delicate parts of the microscope, so handle them with care.
Eyepiece (ocular lens)
The eyepiece is the lens at the top of the microscope that you look through. Most eyepieces magnify 10x, though 5x, 15x and 20x eyepieces are also made. The magnification is printed on the side of the eyepiece.
Microscope heads come in three styles:
- Monocular: one eyepiece. Simple and inexpensive; common on student microscopes.
- Binocular: two eyepieces for viewing with both eyes. More comfortable for long sessions.
- Trinocular: two eyepieces plus a third port on top for attaching a camera. It lets you photograph or stream what you’re seeing; see our guide to microscope cameras.
Objective lenses
The objective lenses are the most important optical parts. They sit closest to the specimen, form the first magnified image, and largely decide how sharp and detailed that image is. Most compound microscopes have three or four objectives mounted on the rotating nosepiece, and each one is color-coded by magnification.
| Objective | Color band | Total magnification* | Best for |
|---|---|---|---|
| 4x scanning | Red | 40x | Finding your specimen and seeing the whole slide |
| 10x low power | Yellow | 100x | General viewing and locating details |
| 40x high power | Light blue | 400x | Individual cells and fine structure |
| 100x oil immersion | White | 1,000x | Bacteria and the smallest details; needs immersion oil |
*With a standard 10x eyepiece.
The higher the magnification, the longer the objective. The 4x is the shortest and the 100x is the longest. The 40x and 100x objectives are usually spring-loaded, so they retract instead of breaking if they touch the slide.
Why the 100x lens needs oil: light bends as it passes from the glass slide into the air gap below the lens, and at 1,000x that bending scatters too much light for a sharp image. A drop of immersion oil, which bends light almost exactly like glass, fills the gap and keeps the light on course. Without it, the 100x objective gives a blurry image.
Condenser
The condenser sits just below the stage. It gathers light from the illuminator and focuses it into a cone on the specimen, which improves brightness and contrast. Many microscopes use an Abbe condenser, a two-lens design that’s especially important at 400x and above. The condenser focus knob moves the condenser up and down. Raising it concentrates more light on the slide.
Mirror (on older and basic models)
Instead of a built-in light, some older and entry-level microscopes use a mirror below the stage to reflect room light or sunlight up through the specimen. These mirrors usually have a flat side and a concave side. Use the concave side in dim light, because it gathers and concentrates more light.
Mechanical parts of a compound microscope
The mechanical parts hold the specimen, move it, and bring it into focus.
Nosepiece (revolving turret)
The nosepiece is the rotating disc under the head that holds the objective lenses. Turning it clicks a different objective into place over the specimen. Always turn it by the ring, not by grabbing the objectives.
Eyepiece tube and adjustments
- Eyepiece tube (observation tube): holds the eyepiece at the correct distance from the objectives.
- Diopter adjustment ring: found on binocular and trinocular heads. Your two eyes rarely focus identically, so this ring, usually on the left eyepiece, lets you fine-tune one side.
- Interpupillary adjustment: lets you slide the two eyepieces closer together or farther apart to match the distance between your eyes.
Coarse and fine focus knobs
The focus knobs move the stage (or, on some models, the head) up and down to bring the specimen into focus. They’re often mounted together on the same axis.
- Coarse focus knob: the larger knob. It makes big movements and is used to find focus at low magnification (4x and 10x).
- Fine focus knob: the smaller knob. It makes tiny movements for a sharp image, and it’s the only knob you should use at 40x and 100x.
Stage, stage clips and stage controls
The stage is the flat platform where the slide sits. Stage clips hold the slide in place. A mechanical stage adds two stage control knobs: one moves the slide left and right, the other forward and back. They let you scan a slide smoothly at high magnification.
Rack stop
The rack stop limits how high the stage can rise. It’s a safety feature that keeps the objective from crashing into the slide and cracking it or scratching the lens.
Pillar and inclination joint (older models)
Some older microscopes have a vertical pillar rising from the base to support the stage, and an inclination joint where the arm meets the pillar, which lets the whole microscope tilt for comfortable viewing.
Illumination parts
- Illuminator: the built-in light in the base, usually LED on newer microscopes and halogen on older ones. LEDs run cooler and last longer.
- Brightness control: a dial that adjusts the light intensity.
- Aperture: the hole in the center of the stage that lets light pass up through the slide.
- Iris diaphragm: an adjustable opening, usually built into the condenser, that controls how much light reaches the specimen. Closing it a little increases contrast; opening it increases brightness. Some basic microscopes use a disc diaphragm instead, a rotating disc with different-sized holes.
How the parts work together
The parts of a compound microscope work as a chain:
- The illuminator shines light upward.
- The condenser focuses that light, and the diaphragm controls how much passes through the aperture.
- The light passes through the specimen on the slide.
- The objective lens collects the light and forms a first magnified image.
- The eyepiece magnifies that image again, and that’s what you see.
Because the image is magnified twice, the total magnification is the two lenses multiplied together:
Total magnification = eyepiece magnification × objective magnification
With a 10x eyepiece, the 4x objective gives 40x, the 10x gives 100x, the 40x gives 400x, and the 100x oil immersion objective gives 1,000x.
How to use a compound microscope, step by step
- Place the microscope on a flat, stable surface and plug it in.
- Rotate the nosepiece so the 4x scanning objective is over the aperture.
- Lower the stage fully with the coarse focus knob.
- Place your slide on the stage and secure it with the stage clips.
- Turn on the illuminator and set the brightness to a comfortable level.
- Looking from the side (not through the eyepiece), raise the stage until the objective is close to the slide but not touching.
- Now look through the eyepiece and slowly lower the stage with the coarse focus knob until the specimen comes into view.
- Sharpen the image with the fine focus knob, and adjust the diaphragm for good contrast.
- Center the part you want to see, then rotate to the 10x and then the 40x objective. Use only the fine focus knob from here on.
- For 1,000x, add a drop of immersion oil to the slide before swinging in the 100x objective.
Not sure what to look at first? Try our list of things to look at under a microscope or these microscope activities for kids.
How to care for your microscope
- Carry it correctly: one hand on the arm, the other under the base. Use a padded case or box for longer trips.
- Don’t touch the lenses: skin oils smear the glass and can damage lens coatings over time.
- Clean lenses gently: use lens paper and lens-cleaning solution only, never tissues, paper towels or anything abrasive.
- Clean off immersion oil right away: wipe the 100x objective with lens paper after every use.
- Protect the objectives: use only the fine focus knob at 40x and 100x, and always start at low power.
- Don’t handle the bulb with bare fingers: on halogen models, skin oils shorten the bulb’s life. Follow the manual when replacing it.
- Cover it when not in use: a dust cover keeps dust off the lenses.
- Store it somewhere cool and dry: humidity can encourage fungus to grow on lenses.
- Don’t take it apart: if the optics get hazy or the focus feels stiff, have it professionally serviced.
Microscope parts FAQ
What are the three main parts of a microscope? The head (body), the arm and the base. The head holds the optics, the arm connects the head to the base and is used for carrying, and the base supports the microscope and usually holds the light.
What is the most important part of a microscope? The objective lenses. They form the first magnified image and determine most of its sharpness and detail.
What part of the microscope holds the slide? The stage, with the stage clips holding the slide in place.
What is the difference between the coarse and fine focus knobs? The coarse knob makes large movements for rough focus at low power; the fine knob makes small movements for a sharp image and is the only one to use at high power.
What does the diaphragm do on a microscope? It controls how much light reaches the specimen. Less light gives more contrast; more light gives a brighter image.
How do you calculate total magnification? Multiply the eyepiece magnification by the objective magnification. A 10x eyepiece with a 40x objective gives 400x.
What is the difference between a compound and a stereo microscope? A compound microscope magnifies thin specimens on slides from about 40x to 1,000x. A stereo microscope gives a lower-magnification 3D view of solid objects. Read more in what is a stereo microscope.
2 Responses